The New York City Marathon is 40 days away (but who’s counting 🙂 ). That means about 30 days of training and 10 days of taper. For those of you running NYC or another fall marathon, here are a few ways to navigate these final weeks of training:
-Your main priority now is getting to the start line healthy, rested and excited!!Resist the temptation to overdo it or overtrain. No, now is not the time to add in a new strength program. And if your knee has been hurting for a few days, skip the workout and let it rest. In the final weeks, less is more.
-Trust the plan and have confidence in your training. Worrying if you should have done something different will only cause unnecessary stress. Your friend is running longer runs than you? It’s ok. That is their training. Know that YOUR training is right for YOU.
-Treat your remaining long runs as dress rehearsals for the big day. Practice running at the same time of day as the race, determine the best pre-race breakfast and fine tune your fueling strategy. It might sound silly but test out your outfit and shoe / sock choice during one of your long runs. Suprise chafing on race day is a total buzz kill.
-Celebrate the journey, the sacrifices, the miles logged and the memories made. Getting to the starting line is an accomplishment in and of itself. Be proud of how far you’ve come.
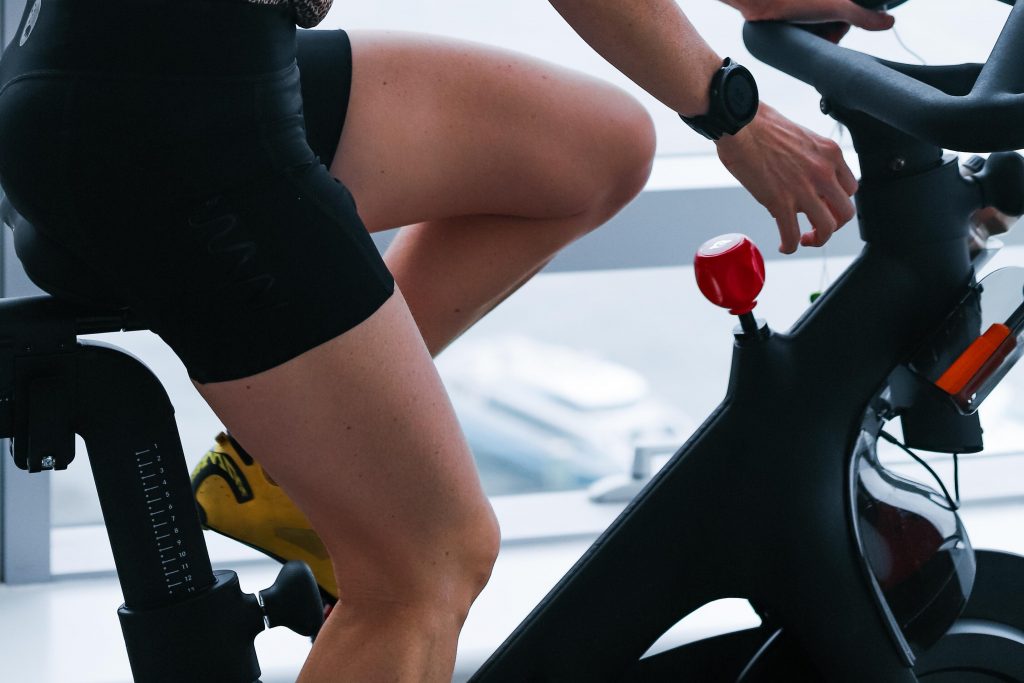
Let’s get something out of the way before we dive in: there is no such thing as a one-size-fits-all, perfect pedal stroke!
But, everyone has their own “perfect pedal stroke” and adding drills to your cycling sessions will help you find it. Drills are an opportunity to focus your efforts on one aspect of your ride. Working on pedal stroke promotes fluidity and leads to maximizing your efficiency and power on the bike.
You can do drills on easy rides or before or after a workout 2-4 times a week (professional cyclists and triathletes do these drills before almost every indoor ride).
So, let’s get to it! Here are three exercises to help get that smooth, pretty, and powerful pedal stroke.
Cycling Drills:
1. Spin-Ups
Spin-ups are a great way to learn how your body is moving on the bike. The intention with this drill is to be able to pedal as smoothly as possible without bouncing in the saddle.
To perform this drill, set your bike to a low resistance and aim for a cadence of about 100-110. Start slow with a smooth pedal stroke and keep your upper body still (i.e, no bouncing or rocking your hips in the saddle). Increase your speed while keeping your pedal stroke smooth. If you feel yourself start to rock, slow yourself down to the cadence where you were pedaling smoothly and pedal there for 1 minute. Take a minute recovery.
For your next rep, try to increase your cadence while still holding that smooth pedal stroke. Do 3-6 reps before or after a cycling session or during an easy ride.
2. Single-Leg Pedal Strokes
This exercise is ideal to practice on your indoor bike rides. The goal is to discover where your weaknesses are in each leg within the 360 degrees of pedal rotation and smooth out those weaknesses.
To perform this drill, have one leg clipped in to your bike and hold your other leg, unclipped, out of the way of the turning pedals. This will force your single clipped-in leg to do all of the work. Ensure that you are still balanced in the saddle when you work on this drill!
Once you are set up, pedal at a cadence of 70-90 on one side at low to medium resistance with the clipped in leg. Try to find your “perfect pedal stroke”. Keep in mind where your weaknesses are and focus on making micro-adjustments to your body so you can achieve a smooth pedal stroke throughout the entire 360 degrees.
Try 3 rounds of :30-60 on each leg.
3. Toe Touch
The intent of this drill is to mentally focus on your pedal stroke so that you can move faster on the bike.
To perform this drill, you will want medium resistance and low speed. When you are moving your foot through your pedal stroke, as you come through the top of your stroke, visualize pushing your toes to the front of your shoe. As you come to the bottom of your stroke, imagine pushing your foot back in your shoe. In other words, visualize back and forth, rather than up and down for your pedal stroke.
Increase speed as you get the hang of this drill. You should feel you are getting more power out of your pedal stroke.
Also, keep in mind that these drills are infinitely easier if you are riding a bike that fits your movement style. If you feel any instabilities while pedaling or the drills feel very difficult, check in on your bike fit or schedule a Team Wilpers bike fit. Our bike fitters are expert cyclists and can watch you pedal, analyze your pedal stroke and coach you through the drills.
Check out this article from today.com featuring Matt.
In the story, Matt discusses the importance of a good bike fit , tips about riding like how and when to ride out of the saddle, and how to use resistance and cadence hand in hand.
He also discusses how to measure your progress in training (think FTP and Power Zones!) and how to diversify your training to reach your goals.
Hi team! We’re back, and excited to share the next installment of the BODY series. Last month we did a deep dive into hip and pelvis health. We got great feedback and are pleased that you found this information to be so helpful. Today, we look at ankles and feet; how they function in running and what we can do to make sure we’re set up for success.
Check out the video and accompanying text as we carefully walk you through some game-changing ankle and feet exercises and share the “why” behind the importance of incorporating these into your training routine.
Part I: Foot and Ankle Function by Coach Emmi
Hey Team. Coach Emmi here @emmiaguillard_dpt. Today I am going to discuss how the ankle & feet function in running.
When a runner’s foot hits the ground, the ankle and foot joint rotate inward to help absorb the shock of hitting the ground and transfer kinetic energy up the chain. This is referred to as pronation.
When a runner pushes off from the ground, the ankle and foot joints adopt a more rigid lever (think of the new carbon plate running shoes) to maximize the amount of power that is propelling you forward. This is supination.
Having a foot that is mobile enough to pronate AND strong enough to supinate is critical for efficient and injury-free running.
In the video above (min 0:00-1:07), I demonstrate pronation and supination and how these movements function in running. I encourage you to stand up and give this a try at home.
Do you feel like you might have a foot that’s a little too flexible, or perhaps too rigid? Keep watching as Coach Carly breaks down how to work on improving the mobility in your ankles and feet.
Part II: Foot and Ankle Mobility by Coach Carly
Hi! Coach Carly here from Team Wilpers @carlyg_dpt . I am going to discuss how to make sure to have pronation and supination in your feet and ankles by doing mobility work that reinforces these motions. The exercises in the video (min 1:10-2:42) are great for everyone as a part of a maintenance routine and even more important for those who feel that they have a ‘rigid’ or ‘stiff’ foot.
Just like we encourage daily hip mobility work (TW athletes you know what I’m talking about), the feet and ankles need some love as well. Mobility exercises also ensure that force is properly dispersed during high impact activities – like running!
The first video (min 1:10) gives you two options of ankle and foot MOBILITY exercises to help increase rangesof motion. These are good to do before and after your runs to get your feet and ankles unlocked.
The second video is an ACTIVATION exercise (min 2:00) to help get the deeper muscles in the foot to turn on and support the ‘supination’ movement that happens when you push off. Activating your deep foot muscles is also good to do before and after your runs. It is especially important for those people that think they have a ‘flexible’ foot.
Try out these exercises and let me know if you have any questions. Please share with anyone you know who may have foot issues. Let’s all stay heathy and strong!
Next, Coach Ryan will share some ways to strengthen the feet and ankles. 💪
Part III: Foot & Ankle Strengthening by Coach Ryan
Hey Team, Ryan here @sslryan strength coach for Team Wilpers. For the third part of the TW BODY Series, I am going to explain how to strengthen the foot and ankles. *Keep in mind that FUNCTION (addressed above with Emmi) and MOBILITY (discussed with Carly), are critical components to understand before you strength train.
Foot and ankle strength and stability is important because strength issues of the foot/ankle will be felt up the kinetic chain (knees, hips, lower back).
To improve these interactions, here are a few exercises to get your feet/ankles strong (min 2:44-3:09).
In the first video, I demonstrate a standing circular calf raise. This exercise is a controlled articulation of the foot and ankle. You want to work both clockwise and counter clockwise on these. Go slowly and really try to feel what is going on as you move. Try to go back and forth for 5 reps each way.
You can do this exercise as part of your warm-up before training or include it in your strength circuit.
In the second video, I demonstrate the stationary toe tap exercise. There is a dynamic aspect as weight distribution rapidly switches from one foot/ankle to the other forcing you to get strong and rigid upon ground contact. This is a great exercise for runners who want pop and stability through the gait cycle. The trick here is to move almost exclusively through the foot / ankle. Try not to lift and flex the hips much.
Do these just before your running drills, during your run warmup. Try going for 30-60 secs. To build strength, hold smaller dumbbells and do 20-30 reps or so 1x.
Give these exercises a try. If you are interested in a full Team Wilpers strength program to compliment your training, check out our private coaching services at Team Wilpers Coaching. For questions please send us an email at trainsmart@teamwilpers.com
Thanks team and as always … Train Hard, Train Smart and Always Have Fun!
As a cyclist and coach I have developed a love and appreciation for the finer details in cycling, including the pedal stroke. Having ridden with and/or coached riders from beginner to professional, I get excited when I see a cyclist with a beautiful pedal stroke. It looks so smooth and efficient that you start to question whether the rider has to exert any effort at all to turn the pedals over! On the flip side, some pedal strokes look very inefficient if not downright painful. This begs the question, how does one perfect their pedal stroke?
While I have done my fair share of research on this subject, the science and general consensus continually change. Nowadays, we know riders can achieve profound pedal stroke improvements from:
1) Understanding what constitutes an efficient pedal stroke.
2) Applying mental cues on how to move our bodies properly while on the bike.
3) Being set up properly on our bikes.
4) Continually working on improving our pedal stroke with drills and practice.
Let’s have a closer look!
So, What is the “perfect pedal stroke“? The overwhelming consensus is that there is no perfect pedal stroke that can be applied to every rider universally. Even the pros don’t have a perfect pedal stroke – and that’s okay! As a coach, I have often instructed riders to think of pedaling in circles, but it turns out this advice has some short comings. In fact, striving for a perfect circle is not sustainable, and over time will likely reduce one’s efficiency of movement. The best and most consistent advice I’ve found is to focus on optimizing your economy of movement and your economy of power.
Let’s discuss these last two points: “economy of movement” and “economy of power”. When we think of “economy” we think of total energy expenditure for a given effort. Thus, when one improves their economy, this means that they are spending less energy for a given effort. In the cyclist’s case, we are talking about optimizing movement between the body and the bike. For example, producing the same amount of power with less effort/energy (i.e. “economy of power”).
However, in order to get our bodies working more harmoniously with the bike, we need to start with how we think about moving our bodies while on the bike. Here are two mental cues that can help:
Imagine the motion of scraping mud or gum off from the bottom of your shoe. You will find that this specific movement begins with driving downward from the heel and following through at the bottom of the pedal stroke. This imagery works well for many riders.
Think about executing your pedal stroke the same as you would the front crawl (or freestyle) when swimming. In freestyle, we don’t actually scoop up water in the back of the stroke to propel ourselves forward, just like we should not think of pulling up on the backside of the pedal stroke to create power. Instead, think about initiating your pedal stroke earlier just like in freestyle when we bring the arm back up over the top to complete the stroke.
Why is a proper bike fit essential to developing a good pedal stroke? This is where things start to get personal. Often you’ll hear me talk about engaging the glutes, relaxing the shoulders and avoid solely relying on the quads for power. This is all much easier to accomplish when you are set up properly on your bike and vice versa. Without proper set up, you may never fully harness the compounding efficiencies that come from using all available muscle groups. For questions about your set up, contact a professional bike fitter in your area or schedule a virtual appointment with a Team Wilpers’ bike fit expert here.
What are some drills that riders can do to improve their pedal stroke? Drills help us reestablish, reinforce and refine proper movement. Here are some simple drills you can include in your training to help improve your pedal stroke:
Spin-ups: I know many of you won’t be surprised to learn that I love spin-ups. A ‘spin-up’ is where you pedal at a high cadence and low resistance for 30 sec to 1 min and focus on using your body to control the pedals and avoid bouncing. Spin-ups are great to do as a drill to get your mind, body and bike working together efficiently and 3-6 of them usually do the trick. I like these because the higher cadence efforts force your brain and body to communicate so that your legs find the path of least resistance to a smoother pedal stroke. I can always tell when my brain and body are not getting along because these will feel really rough haha!
Single-leg Pedal Strokes: If you have taken any of my Low Impact classes at Peloton, you’ve done these. Here you are just focusing on isolating one leg at a time to pedal with. Just like in weightlifting, isolating sides helps you uncover and correct any imbalances and inefficiencies that would otherwise remain muted or too subtle to notice when both sides are working together. You can keep both legs clipped in or even unclip the leg that you are not pedaling with. However, in both cases it is important to keep the hips level in the saddle as if both legs were clipped and being used. I like to do 2-4 sets of one minute or longer on each side. In terms of cadence, I recommend starting slow and then working your way up to higher cadences.
Practice Thoughtfully: Likely the best drill of all is just getting on the bike and riding more. Afterall, more pedal strokes = more practice! But, while you are getting after it, remember to keep working at smoothing out your pedal stroke, especially during warm-ups and cool-downs.
Team, I hope you enjoyed uncovering some of the nuances of pedal stroke! For more practice and tips on perfecting your pedal stroke, please check out my Low Impact classes at Peloton. And to get your fit dialed-in, schedule an appointment with a member of Team Wilpers Bike Fit. Until next time, remember to train hard, train smart and always have fun!
Most of us learned to ride a bike as a kid, when proper “form” meant you might get more airtime jumping off the sidewalk curb. Just me? 🙂
With the rise in popularity of spinning and cycling, many of us have found our way back to the bike and nowadays, there’s endless options to spend more time in the saddle. But, if we don’t pay attention to some of the details surrounding our posture and technique, we could end up stuck on the sidelines.
These ‘details’ can be easily addressed by working with a Bike Fit Specialist. I recently had the pleasure of chatting with Bike Fit expert, Jim Escobar. Jim is a member of Team Wilpers Virtual Bike Fitting. He works with riders on their stationary bikes (like Peloton) over a virtual platform (like FaceTime) to help cyclists find a more comfortable ride. Additionally, Jim is the owner of ProTriFit in St. Augustine, Florida where he performs in-person bike fittings.
Jim has over 20 years of industry experience. From his own triathlon and road racing days to covering the Tour de France as a reporter, Jim has seen it all. On top of that, he is a Certified Bike Fitter from Retül University, Guru Academy, F.I.S.T. Fitness Institute Slowtwitch, Certified USA Cycling Coach and Certified USA Triathlon Coach.
There are endless cycling topics that I’d love to nerd-out to with Jim, but for this Q & A we chose to look at proper positioning in the saddle. Whether you’re new to cycling or a well-oiled machine, I know you’ll find a few great take-aways in our discussion below. I personally learned a ton and couldn’t wait to share with all of you. Check out our interview on Instagram Live or read below for a synopsis.
Matt: How does one go about sitting on the saddle properly?
Jim: To sit on the seat properly, the athlete must first engage their core, similar to the effort to sit up straight (i.e., think of having dinner with the Queen). Engaging the core lets the pelvis tilt rearward, then allowing the sit bones to become more prominent. Once the core is engaged, we want the athlete to roll their upper body forward to reach the bars (i.e., think ‘punch to the stomach’ or ‘belly-button on a string being pulled through the back of your shirt’), while keeping their weight on the sit bones, and not on the soft tissue.
Matt: Why is this important?
Jim: This is important as having the weight on the sit bones / sitz bones (ischial tuberosities) will allow the power to be successfully transferred to the feet and the pedals. It also allows the rider to not have too much pressure on the soft tissue area (perineum).
Matt: What are some simple ways to reinforce this during a ride?
Jim: To make sure the rider is engaged and has their weight on the sitz bones, they can check that they always have a bend in their elbow. This ensures that they are not leaning on the bars, but rather just resting on them. A light grip and a bend in the elbow is a great way to make sure a rider is sitting properly on the saddle.
Matt: How does being properly fitted for your bike play a role.
Jim: Once we have the ability to sit properly on the seat, we must then make sure our fit on the bike is correct to allow us to maximize our efficiency and comfort. With a bike fit, you can be assured that your seat is set at the correct height, allowing the most efficient leg and ankle extension. Each athlete will have a different point where they are efficient, i.e., some riders have a lower seat height/less leg extension, while others have a taller seat height/greater leg extension. The fore/aft position of the saddle is best adjusted by keeping the knee just behind the center of the pedal (just in front of the 5th metatarsal). The handlebar height will be set based on the riding style. For riding a Peloton bike, I suggest keeping the bars higher (as there is no aerodynamic penalty for higher bars), as it helps to open up the rider’s hip angle, which typically allows for more power. The Bike Fit Team at Team Wilpers can assuredly help all athletes find their most efficient and comfortable position.
Matt: What causes one’s hips to rock too much?
Jim: Typically, rocking of the hips is caused by the seat height being too tall. This causes the legs to overextend to reach the bottom of each pedal stroke, pulling the body from side to side.
Matt: What amount of pain is appropriate (and in what location ) vs. inappropriate and should be fixed?
Jim: A certain amount of ‘discomfort’ is normal as we acclimate to a proper seat position. We will feel sore or tender directly over the sitz bones. This discomfort will ease after several rides, until the body becomes accustomed to the pressure. Pain such as numbness or chafing is not acceptable and should be addressed. Numbness can be caused by too much pressure on the perineal (soft tissue) area. The saddle may be angled upward, or the athlete is not sitting properly; with their weight on the sitz bones. Chafing can be caused by the saddle being too wide for the rider, or just the rider’s legs are wide and rubbing against each other. To remedy this, a rider should use cycling shorts with a chamois, and apply chamois cream to the affected areas.
Matt: What should one look for in a good bike saddle?
Jim: A good saddle is one that supports the rider firmly, yet still offers a degree of cushioning. It should be the proper width to provide a foundation for the sitz bones. The best way to find a saddle, is to try many saddles, as our butts are the best judge of a good saddle.
Matt: Which is better, padded seat or padded shorts?
Jim: 100% – a good pair of cycling shorts are better than a padded seat. The cycling shorts move with your body and provide the support only in the areas that need it. A seat pad often has too much gel, which then moves away from the sitz bones (as these bones are pointy and seem to break down the gel at the point of contact), and allows too much motion on the saddle.
A good pair of shorts will fit snugly and provide compression for the muscles. Be aware that different manufacturers size their garments differently, so you may be a Medium in one brand and a Large in another.
I want to thank Jim for sharing his time and expertise with our community of riders. The importance of proper saddle positioning cannot be overstressed and could make all the difference in the comfort of your ride. Team, we’re on this journey together and I hope that by partnering up with experts like Jim, we can all keep riding together for years to come. There’s nothing I enjoy more than receiving your letters and feedback and hearing about your accomplishments both on and off the bike! Until next time, train hard, train smart, and alway have fun!
Triathlon season is here! Whether you are jumping into your first triathlon or are looking to take your talents to the highest level, Team Wilpers is here to guide you.
Our triathlon coaches are literally pros; between them claiming hundreds of professional wins and podium finishes from around the world. But, they will be the first to point out that they started out just like many of you: overwhelmed, not knowing how to clip in and out of bike shoes, unsure about gear, nutrition and what workouts to do and when.
We put together this series to address your concerns and to help you envision yourself participating and enjoying triathlon. Our coaches, Bec Wassner, Laurel Wassner and Jenny Fletcher are excited to share their very own real-life experiences and helpful tips they’ve picked up along the way. In this first series, we will share practical advice for schedule management, learning to love swimming and choosing your bike gear.
Coach Bec: Weekly Scheduling
One of the biggest challenges triathletes face is how to fit in training for 3 sports on top of a job, a family, and a life! That’s where Team Wilpers comes in to help balance things out, and of course, make it fun! The key to planning a schedule for a busy athlete is to emphasize QUALITY and CONSISTENCY. Make the most of your time with well-planned workouts designed for efficiency and results. Indoor riding/running and coach Matt’s classes are perfect for this. As for consistency, keep the big picture in mind. Try not to get overwhelmed about fitting everything in. Remember, the biggest gains occur when you can string together workouts not just day to day, but week to week and year to year.
Coach Laurel: Learn to Love Swimming
Swimming is new for many triathletes and it can be intimidating and frustrating. Coach Laurel shares some tips on how to spice up your swim session and learn to love swim days.
Do a mix of distances, speeds, and strokes. This keeps you engaged and builds a better strength profile.
Recruit friends to join you! This is great for accountability (this is how I first met @mattwilpers). Plus, you can incorporate partner swim drills which are both fun and effective.
Relax, breath consistently, and let go of any expectations and comparisons to the lane next to you.
Use swim toys like pull buoys, paddles, snorkels and kick boards to help with technique, strength and endurance. Again, fun and highly effective.
Have a snack waiting for you when you finish – trust me on this one 😉
On swim focus days, make swimming your first workout of the day. Trying to hit times after a bike ride is hard and frustrating. On the flip side, an easy swim is a great idea after a hard ride or run.
Smile, say hi to your lane mates and come up for air. Taking short breaks at the wall to chat or take a sip of water helps bring your heart rate down and prepares you for the next interval.
If your set includes intervals without much rest, stay positive, stay strong and power through. Remind yourself it will pay off in the end.
Coach Jenny: Gear
Triathlon gear can be overwhelming to say the least. With not just one, but three sports to contend with, I recommend doing your research and talking with other triathletes as much as possible. Listen to other athletes’ “must haves” and decide for yourself if you see the alleged benefits. In the beginning, borrow or rent items that you might not have. This helps you get a feel for what you like (and don’t like), so you’ll be ready when it’s time to purchase new gear.
Keep an open mind. Triathlon is unique because there is so much more that goes into it than just “who is the fastest”. Moving effortlessly through three disciplines will present new challenges and may leave you doubting your initial gear choices. Be open to trying new things and new strategies as you progress through the sport.
Make sure you train with the gear that you are planning on racing in. There’s nothing worse than a gear fail on race day, especially if it could have been avoided. Know what you’re working with and be familiar with all the components of your equipment.
Below is a list of CYCLING gear that I currently use. I’ve had the opportunity to try lots of different products, so I definitely know what I like.
BIKE
Triathlon bike: Specialized Shiv – fast, aero and comfortable
Road bike: Specialized Tarmac SL7 (the same bike that Matt rides).
SHOES
The S-Works 7 Road Shoes – very comfortable and durable. They have a wide toe box which allows for your foot to spread out and can help with neuromas and metatarsal pain.
SUNGLASSES
Oakley Encoder – chic and designed for athletes. Oakley also makes great bike helmets.
BIKE KIT
Santini – A family owned Italian brand run by women. Very well made, luxury and durable cycling clothing.
It’s no secret that strength training is beneficial for cyclists. From health benefits such as improved bone density to performance benefits such as improved pedal stroke force production and efficiency, it’s easy to see why cyclists are hitting the weights.
However, as an athlete and coach, I know that lifting for your sport is very different from lifting for other purposes and if you don’t do it right, both your weightlifting and cycling performances suffer. Instead, the schedules and exercises must complement one another.
To further expand on this topic, I reached out to Team Wilpers in-house applied strength expert, Ryan Hopkins. From middle school athletes to MLB and NFL players, he knows how best to enhance sport performance using strength training. Please see below for our interview Q&A:
Matt: What are the benefits of strength training for cyclists?
Ryan: There are primarily two:
1) By building a stronger body using weights, you are better able to handle cycling training load and thus progress faster. I like to think of this as changing your own “stress vs strain curve”. In other words, you experience less strain for a given amount of stress.
2) Strength training puts stress on your body’s neuromuscular connections (think mind to muscle). This stress stimulates improvements in intramuscular coordination and intermuscular coordination. With improved coordination, your body gets more efficient, burning less energy for the same amount of work on the bike.
Matt: Just as the demands of your cycling training should change throughout the year (think “in-season” vs “off-season” training) so should the demands of your strength training. How should strength training for cyclists differ during periods of more intense cycling training vs periods of less intense cycling training?
Ryan: Great question and what we often see are people trying to achieve everything at the same time. This results in less than optimal performances both on and off the bike. Just like everything in life, it’s about knowing your priorities and when to focus on what. At a high level, when the demands of your cycling training are high, strength training needs to take a back seat…and vice versa. Here are some more specific tips:
During in-season/more demanding cycling training:
Focus more on muscle activation vs overload and simply maintaining what was built in the off season.
Think low weight, low reps and moderate effort so that the residual fatigue from your strength session does not interfere with your next cycling session.
1-2 days a week of strength training a week is sufficient with low to moderate weights at low to moderate volume.
During off-season/less demanding cycling training:
As it becomes easier to meet the demands of your cycling training, you can focus your efforts more on strength training volume and intensity. This is when you can really “move the needle” in your strength game prior to your next big ramp up in cycling training.
Think of strength training 3-4 days a week and try to incorporate a blend of higher intensity with volume and load.
Matt: We often hear that during more demanding phases of cycling training, cyclists are riding hard 3 days a week. When would you have them strength train? Also, would the experience level of the athlete make a difference (i.e. beginner vs advanced)?
Ryan: Just like most things in life, “it really depends” haha. Remember that the end goal is the following: Avoid letting the residual fatigue of the weight session interfere with the rider’s performance in their next workout. More experience athletes tend to recover faster than less experienced athletes. That isn’t “always” true, but something to take into consideration.
For the vast majority of people, getting off the bike on those harder ride days and getting after some minimally invasive exercises while they are still warm makes the most sense. Muscle activation is achieved but also muscular endurance is stimulated given their body hasn’t had much time to recover from the ride. It just should not be very heavy weight.
However, with stronger athletes that can recover more quickly, you could do the following:
Have them wait 6-12 hours post hard ride and then hit the weights. This keeps the subsequent recovery day still an actual “recovery day” while allowing the athlete to have a little more energy and sharpness to push during the weight session.
Have the athlete do strength training on the day after a hard ride with the same rules applied…not doing so much that they can’t meet the demands of their next session.
Matt: Cycling is a very leg dominant sport. Should athletes only strength train their legs?
Ryan: True, however you want the athlete strength training the entire body with an extra emphasis on the legs and hips (or lumbo-pelvic region). The gains you are hoping to achieve on the bike include force production and posture.
Matt: What are 1-2 high value exercises cyclists can do “in-season”? Same question but in the “off-season”?
Ryan: Really some of the high value exercises most specific to cycling would be the same in-season vs off-season but the difference would be in volume and intensity of their application. Here are a few examples:
Romanian dead lifts (single and double leg)
Single leg reverse lunges
Single leg split squat variations for example having your rear foot elevated
Lateral squat walks
Isometric single and double legged wall sits
We hope you enjoyed this interview with Team Wilpers strength coach, Ryan Hopkins. If you would like to train or book a consultation with Ryan, please visit us at Team Wilpers.
Have a great day and remember to train hard, train smart and always have fun!
Team Wilpers bike fitter, Anna Pecora is passionate about helping others reach their goals and overcome their fears. Anna fits cyclists virtually through Team Wilpers and is also the owner of Naked Cycling LLC located in Northern Virginia. Anna has been working in the bike industry since 2004 and professionally bike fitting since 2013. She is both, Specialized Body Geometry and Retul certified, as well as Trek Precision Fit certified. We wanted to get to know Anna better and find out what drives her passion for finding the perfect fit and helping riders unlock their true potential.
Team Wilpers: How did you first get into Bike Fitting?
Anna: I was kind of thrust into it really. I have a love for helping people get over fears and accomplish their goals and an interest in understanding the body. My boss at the time elected me to get certified after seeing how much customers enjoyed working with me. That’s really where it all began.
Team Wilpers: What’s your cycling background?
Anna: I purely ride for joy and exercise. I’ve competed in a few local races but I’m more about hopping on a bike to move, feel the wind, and hear the rubber against the ground.
Team Wilpers: What kind of biking do you do now?
Anna: By far, mountain biking is my favorite. You have no choice but to get out of your head, otherwise you’ll be eating dirt! I also ride road, gravel and cyclocross.
Team Wilpers: Role models you look(ed) up to?
Anna: Hands down my dad. He’s a physicist and any chance I get, I tell people about him. He’s a very thoughtful objective, and intelligent person. So, much of who I am today is because of him. Especially my humor!
Team Wilpers: Favorite part about virtual bike fitting?
Anna: My favorite part is working with the people! Everyone has been so enthusiastic about the virtual fits. Even those who were initially a little apprehensive, warm up very quickly once we get the fit moving. I feed off of that so much!
Team Wilpers: Something you wish every cyclist knew?
Anna: Not only to get a bike fit but also that bike fits are never one and done. Our bodies will inevitably change over the course of a year or two, whether we put work into it or not. It’s so important to get re-fit!
Team Wilpers: Guilty pleasure?
Anna: Chocolate. And plants. A lot of plants…
Team Wipers: Success story with a client that you’re proud of?
Anna: I have one rider who I’ve fit three times. The first time was before his first knee replacement, the second was after his first knee replacement, and the third was after his second knee replacement. He actually just emailed me recently because he bought a new bike and needs a new fit! He’s a great example of why I love what I do: I learn so much from my clients.
Team Wilpers: Have you worked with any celebrities?
Anna: You know, I don’t think I can say I’ve worked with anyone who is super famous. I’ve worked with local racers and riders who have traveled from other states to see me, but nothing on par with some of our other fitters. But that’s ok! I love all of the riders I’ve helped and I strive everyday to learn and expand my knowledge of the body and the bike. To me, that’s what counts!
Team Wilpers: What are your essential gear items when you hop on the bike?
Anna: One thing I always make sure to put on for a ride is my favorite lipstick. Don’t ask me why! Maybe this is my one superstition?
Team Wilpers: Favorite race or place you’ve ridden?
Anna: I remember doing a Bike MS ride when I was 18 through Purcellville, Va and it was absolutely gorgeous. That ride is what I always think back to if I ever need motivation to ride. Find the ride that makes you fall in love with biking!
Over the course of her career Anna has helped hundreds of riders feel more confident and comfortable on their bike, as well as avoid unnecessary injuries. She sees bike fitting as an opportunity to not only adjust the bike to fit the rider, but also to educate the rider about how their body moves on the bike and suggests ways to improve their cycling experience through off-the-bike work. Please visit Team Wilpers Bike Fitting to schedule a session with Anna.
Thanks Anna for sharing your passion and expertise with everyone in the stationary bike riding community. We appreciate all you do to keep us pedaling happy.
Introducing the Team Wilpers BODY Series. Each installment in this series will focus on a different area or region of the body. We will discuss correct positioning, mobility and show you strength exercises that will help increase performance and keep you injury free.
Check out the video and accompanying text below as we carefully walk you through some game-changing hip and pelvis exercises and provide the “why” behind doing so.
Hey guys, it’s Carly. In the photo above, you’ll see an optimal hip/pelvis position demonstration. Notice how even a slight variance in hip angle (an inward or outward tilt) can lead to big changes in posture. The goal is to find that “neutral” position and move in and out of it smoothly and with control.
One of the main functions of the pelvis is to absorb shock during movement and provide stability to surrounding muscles. Being aware of your pelvis’ position and making small, corrective adjustments throughout the day can pay dividends over time. Stiffness, due to poor posture or limited mobility, can lead to decreases in flexibility, pain and even injury.
Get to know your pelvis by practicing the movements I demonstrate in the video (min 0:00-0:30).
Hi team, Emmi here. It is very important to understand the way the pelvis is designed to move. It is designed for MOBILITY in all three planes of motion: front to back, side to side, and rotationally.
First, you will see me demonstrate hip flossing. Make sure that your pelvis is what is moving, not your low back or thigh.
Second, I demonstrate hip CARS. These should be slow and controlled. This exercise is very important for joint mobility and neuromuscular control of your body’s movement in all directions. Pelvic mobility and control is critical for proper form and mechanics in running, cycling, and swimming! Demonstrations in video (min. 0:30-1:40).
Coach Ryan here. We round out this installment with some hip strengthening exercises. Hip strength is very important in running and cycling because this region is essentially our engine. Maintaining pelvic orientation with respect to the ribcage is essential for encouraging optimal function up and downstream of the pelvis (think shoulders and legs). First, I demonstrate a low load, hip bridge march. This is an exercise where we develop strength and endurance of pelvic musculature and awareness of hip position. This emphasizes coordination of the posterior chain and the hamstring’s interaction with the underside of the pelvis.
You can do this exercise as part of your warm-up before a training session, or, included in your strength circuit. I like to go back and forth for 20 reps (10 per side) with a 2 second up, 2 second down tempo. Second, you’ll see me do the slow march. This exercise focuses on developing the muscles of the hip that are located on the front of our body (quads, hip flexor complex) and is critical when it comes to maintaining proper pelvic positioning. The slow march is perfect for a comprehensive warm-up or in a strength circuit. I like to go for 1 minute per round with a 2-3 second pause per rep. Demonstrations in video (min 1:40-3:41).
Give these exercises a try. If you are interested in a full Team Wilpers strength program to compliment your training, check out our private coaching services at Team Wilpers Coaching. For questions please send us an email at trainsmart@teamwilpers.com
Thanks team and as always … Train Hard, Train Smart and Always Have Fun!